AIって結局何なのかよく分からないので、とりあえず100日間勉強してみた Day15
経緯についてはこちらをご参照ください。
前回の内容は下記をご参照ください。
■本日の進捗
●ディープラーニングを使えるようになる
■はじめに
これまで使ってきたscikit-learnは従来の機械学習アルゴリズムのためのライブラリで、ディープラーニングに特化したライブラリではありません。多くの場合、Googleが開発したTensorFlow(Keras)やFacebookが開発したPyTorchがディープラーニング専用のPythonライブラリとして使われています。
一応scikit-learnでもneural_networkパッケージが利用できるので、今回もこのライブラリを使っていきたいと思います。
■多層パーセプトロン
多層パーセプトロン(multilayer perceptron : MLP)はフィードフォワードニューラルネットワークと呼ばれる比較的簡単なディープラーニングアルゴリズムです。
線形モデルの入力から出力までの間に複数の層を追加することで、(活性化関数を使って)非線形性を持たせることが可能になります。つまり複雑なデータに対してモデル化できるようし、本来捉えられないパターンを学習できるようになります。
$$ \hat{y} = w[0] \times x[0] + w[1] \times x[1] + \cdots + w[[p] \times x[p] + b $$
線形モデルでは重み(w)を学習し、入力特徴量(x)の重み付き和で答えを予測しますが、この入力(x)から出力(y)の間に「隠れ層」と呼ばれる新たなノード(h)を追加します。この隠れ層を何層も追加することから、多層パーセプトロン、(深い層になるので)ディープラーニングと呼ばれます。
ちなみに入力(x)から各層(h)へはすべての組み合わせですべての層へ繋がるので、その接続がまるで脳のニューロンのように見えることからニューラルネットワークとも言われます。
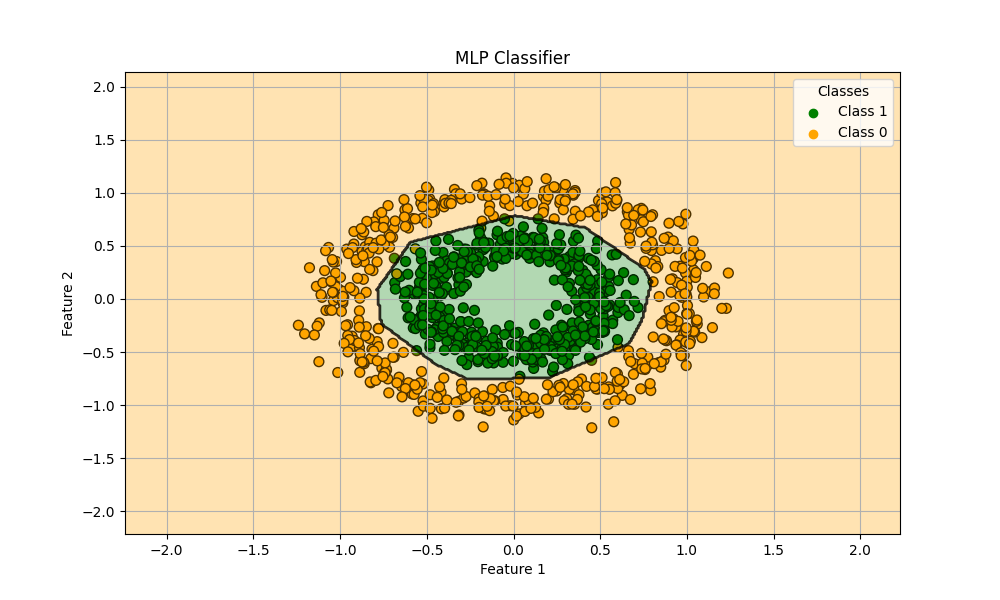
前回も用いたデータセットに多層パーセプトロンを適用してみたいと思います。
import numpy as np
import matplotlib.pyplot as plt
from sklearn.datasets import make_circles
from sklearn.model_selection import train_test_split
from sklearn.neural_network import MLPClassifier

X, y = make_circles(n_samples=1000, noise=0.1, factor=0.5, random_state=8)

X_train, X_test, y_train, y_test = train_test_split(X, y, test_size=0.3, random_state=8)

model = MLPClassifier(hidden_layer_sizes=(10, 10), max_iter=1000, random_state=8)
model.fit(X_train, y_train)

print("train score: {}".format(model.score(X_train, y_train)))
print("test score: {}".format(model.score(X_test, y_test)))

x_min, x_max = X[:, 0].min() - 1, X[:, 0].max() + 1
y_min, y_max = X[:, 1].min() - 1, X[:, 1].max() + 1
xx, yy = np.meshgrid(np.arange(x_min, x_max, 0.01), np.arange(y_min, y_max, 0.01))

Z = model.predict(np.c_[xx.ravel(), yy.ravel()])
Z = Z.reshape(xx.shape)

plt.figure(figsize=(10, 6))
plt.scatter(X[:, 0], X[:, 1], c=y, cmap=plt.cm.colors.ListedColormap(['orange', 'green']), edgecolors='k', s=50)

plt.contourf(xx, yy, Z, alpha=0.3, cmap=plt.cm.colors.ListedColormap(['orange', 'green']), levels=np.arange(-0.5, 2, 1))

plt.contour(xx, yy, Z, alpha=0.8, levels=[0], linewidths=2, colors='black')

plt.scatter([], [], c='green', label='Class 1')
plt.scatter([], [], c='orange', label='Class 0')
plt.legend(title='Classes')

plt.title('MLP Classifier')
plt.xlabel('Feature 1')
plt.ylabel('Feature 2')
plt.grid()
plt.show()
train score: 0.9928571428571429
test score: 0.9833333333333333
●α
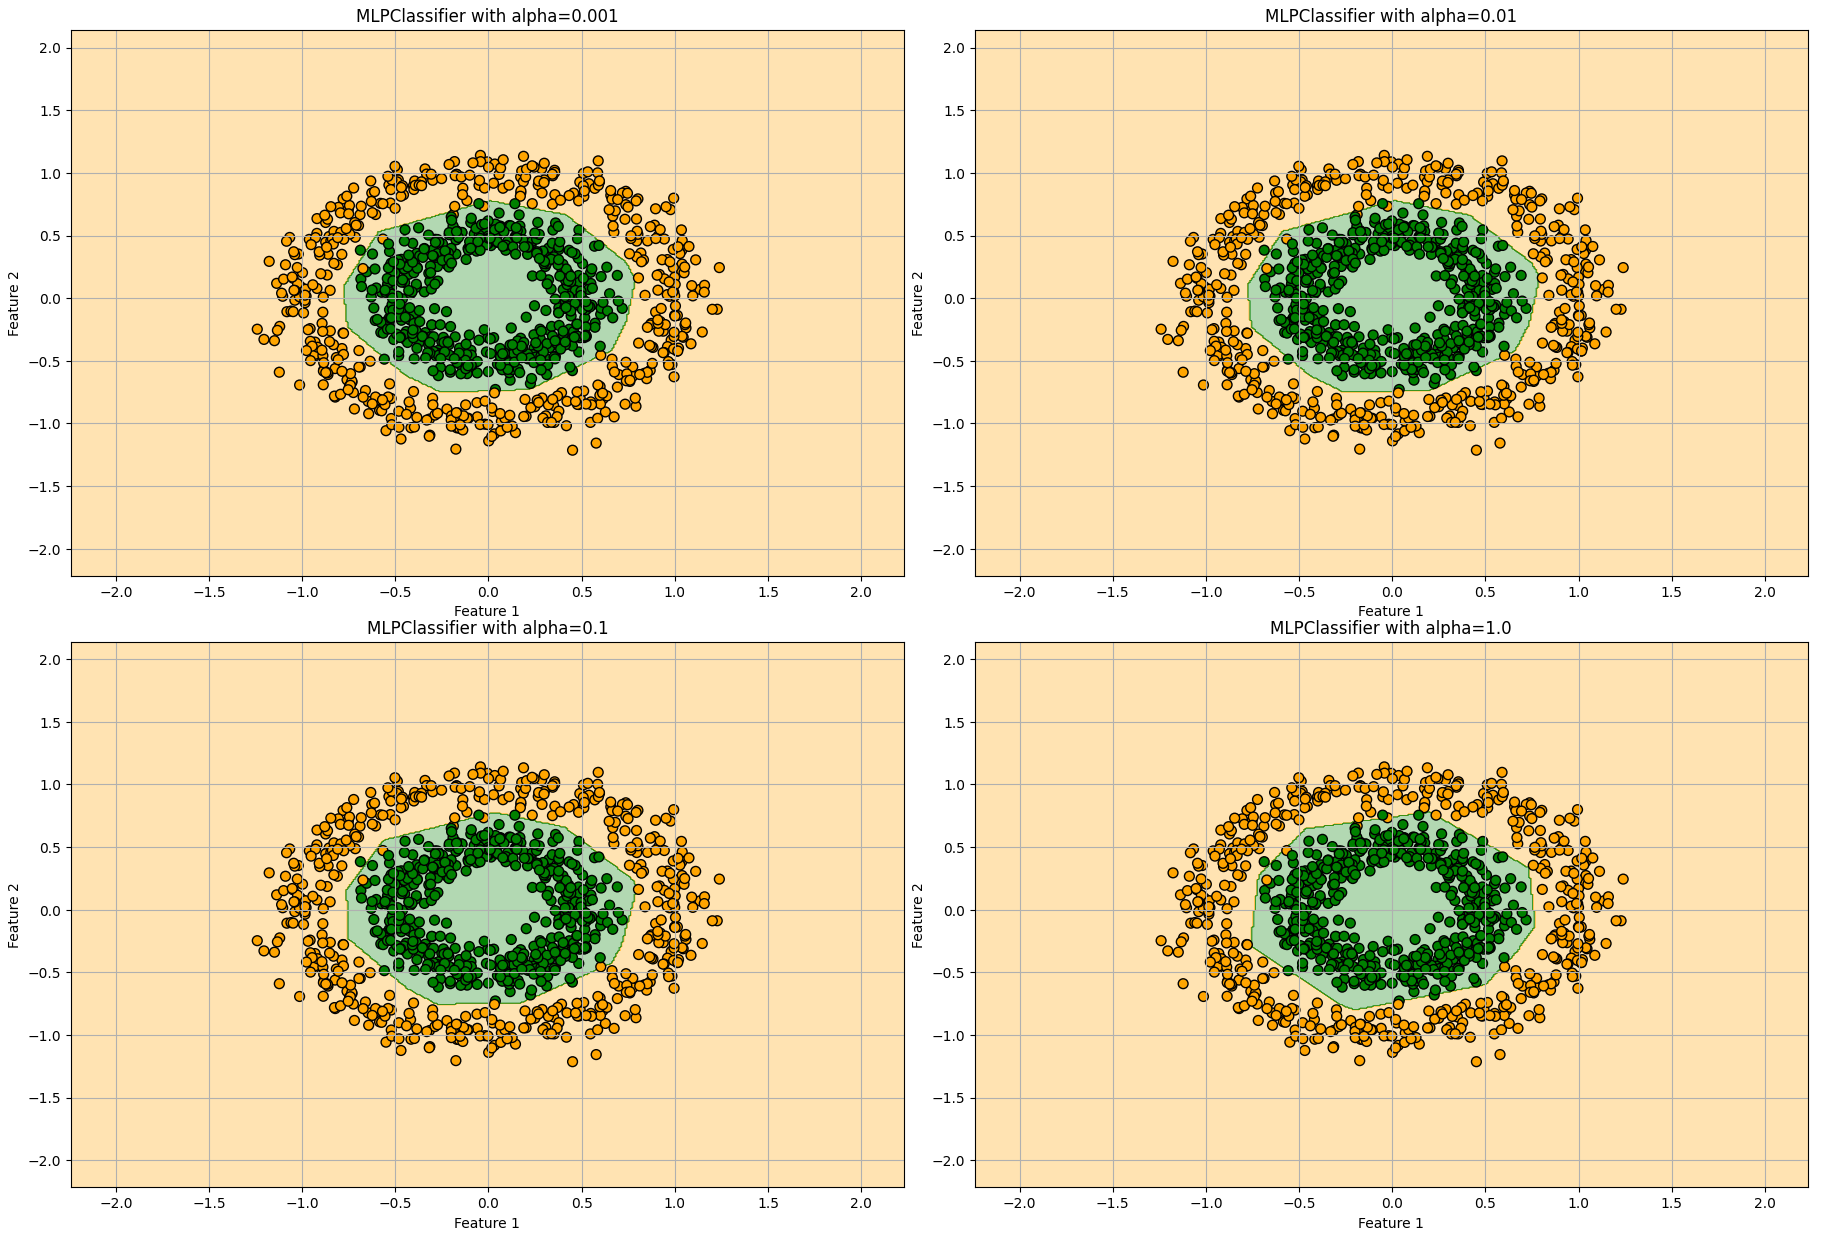
多層パーセプトロンの場合もL2正規化を使っていて、パラメータαで過剰適合を制御できます。
αの値を0.001, 0.01, 0.1, 1.0で振ってみました。
import numpy as np
import matplotlib.pyplot as plt
from sklearn.datasets import make_circles
from sklearn.model_selection import train_test_split
from sklearn.neural_network import MLPClassifier

X, y = make_circles(n_samples=1000, noise=0.1, factor=0.5, random_state=8)

X_train, X_test, y_train, y_test = train_test_split(X, y, test_size=0.3, random_state=8)

alphas = [0.001, 0.01, 0.1, 1.0]

cmap = plt.cm.colors.ListedColormap(['orange', 'green'])

plt.figure(figsize=(20, 15))

for i, alpha in enumerate(alphas, 1):
    model = MLPClassifier(hidden_layer_sizes=(10, 10), max_iter=1000, alpha=alpha, random_state=8)
    model.fit(X_train, y_train)

    x_min, x_max = X[:, 0].min() - 1, X[:, 0].max() + 1
    y_min, y_max = X[:, 1].min() - 1, X[:, 1].max() + 1
    xx, yy = np.meshgrid(np.arange(x_min, x_max, 0.01), np.arange(y_min, y_max, 0.01))

    Z = model.predict(np.c_[xx.ravel(), yy.ravel()])
    Z = Z.reshape(xx.shape)

    plt.subplot(2, 2, i)
    plt.contourf(xx, yy, Z, alpha=0.3, cmap=cmap)
    plt.scatter(X[:, 0], X[:, 1], c=y, cmap=cmap, edgecolors='k', s=50)

    plt.title(f'MLPClassifier with alpha={alpha}')
    plt.xlabel('Feature 1')
    plt.ylabel('Feature 2')
    plt.grid()

plt.tight_layout()
plt.show()

それほど大きな変化は見られませんが、αの値が大きくなると単純なモデルになっていくことが分かります。
●隠れ層
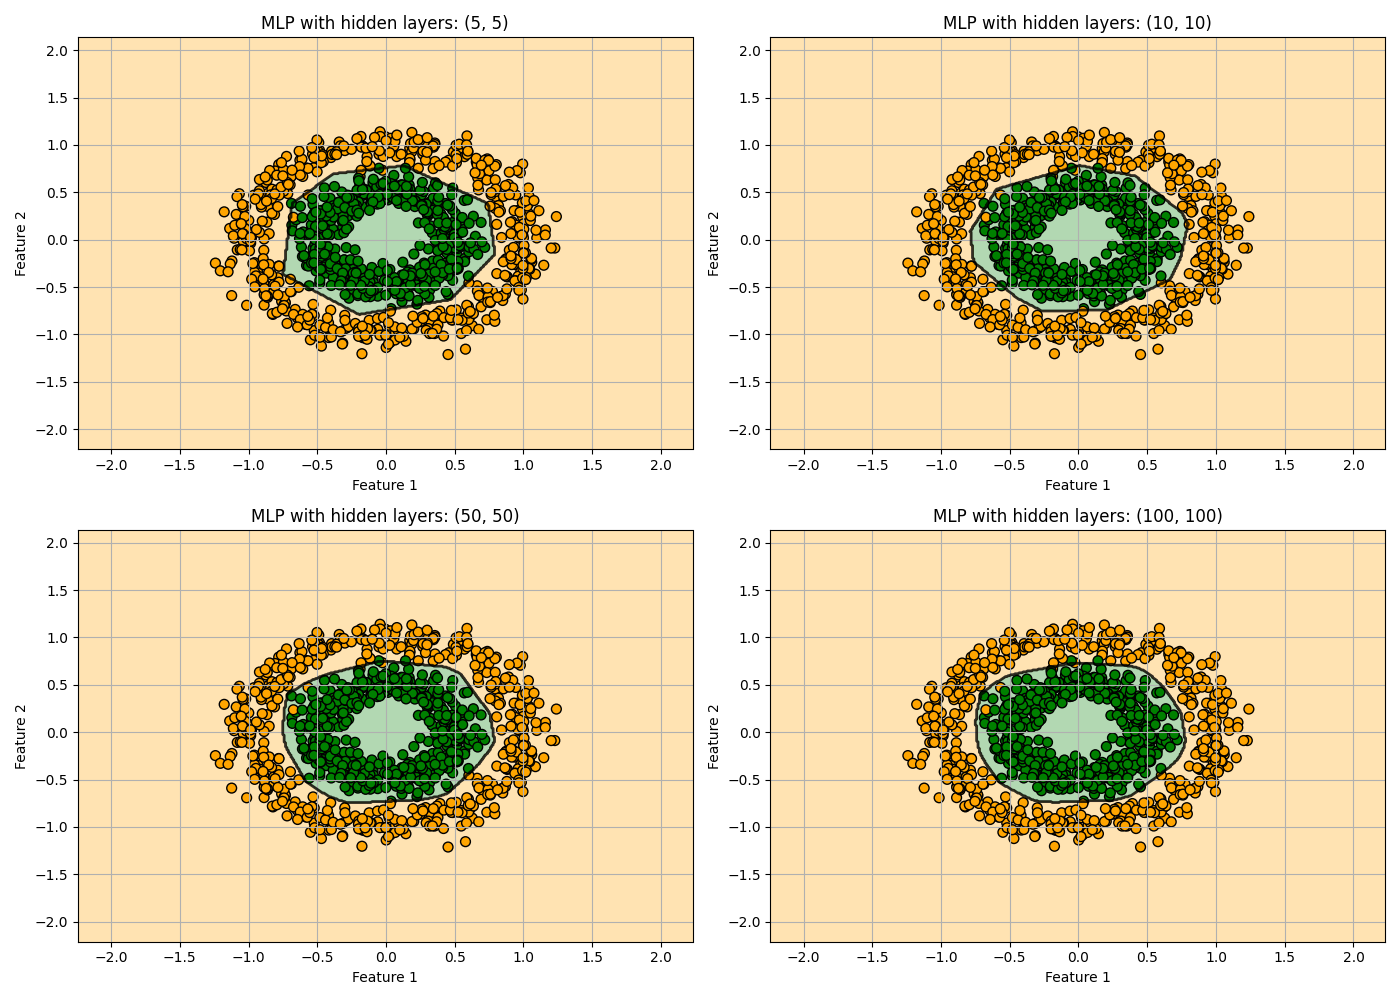
次は各隠れ層のノードの数を5, 10, 50, 100で振ってみたいと思います。
import numpy as np
import matplotlib.pyplot as plt
from sklearn.datasets import make_circles
from sklearn.model_selection import train_test_split
from sklearn.neural_network import MLPClassifier

X, y = make_circles(n_samples=1000, noise=0.1, factor=0.5, random_state=8)

X_train, X_test, y_train, y_test = train_test_split(X, y, test_size=0.3, random_state=8)

hidden_layer_sizes_list = [(5, 5), (10, 10), (50, 50), (100, 100)]

x_min, x_max = X[:, 0].min() - 1, X[:, 0].max() + 1
y_min, y_max = X[:, 1].min() - 1, X[:, 1].max() + 1
xx, yy = np.meshgrid(np.arange(x_min, x_max, 0.01), np.arange(y_min, y_max, 0.01))

fig, axes = plt.subplots(2, 2, figsize=(14, 10))
axes = axes.ravel()

for i, hidden_layers in enumerate(hidden_layer_sizes_list):
    model = MLPClassifier(hidden_layer_sizes=hidden_layers, max_iter=1000, random_state=8, alpha=0.0001)
    model.fit(X_train, y_train)

    Z = model.predict(np.c_[xx.ravel(), yy.ravel()])
    Z = Z.reshape(xx.shape)

    axes[i].contourf(xx, yy, Z, alpha=0.3, cmap=plt.cm.colors.ListedColormap(['orange', 'green']), levels=np.arange(-0.5, 2, 1))
    axes[i].contour(xx, yy, Z, alpha=0.8, levels=[0], linewidths=2, colors='black')
    axes[i].scatter(X[:, 0], X[:, 1], c=y, cmap=plt.cm.colors.ListedColormap(['orange', 'green']), edgecolors='k', s=50)

    axes[i].set_title(f'MLP with hidden layers: {hidden_layers}')
    axes[i].set_xlabel('Feature 1')
    axes[i].set_ylabel('Feature 2')
    axes[i].grid()

plt.tight_layout()
plt.show()

隠れ層のノードを増やすと決定境界が滑らかになっていく様子が見て取れます。
●Layers
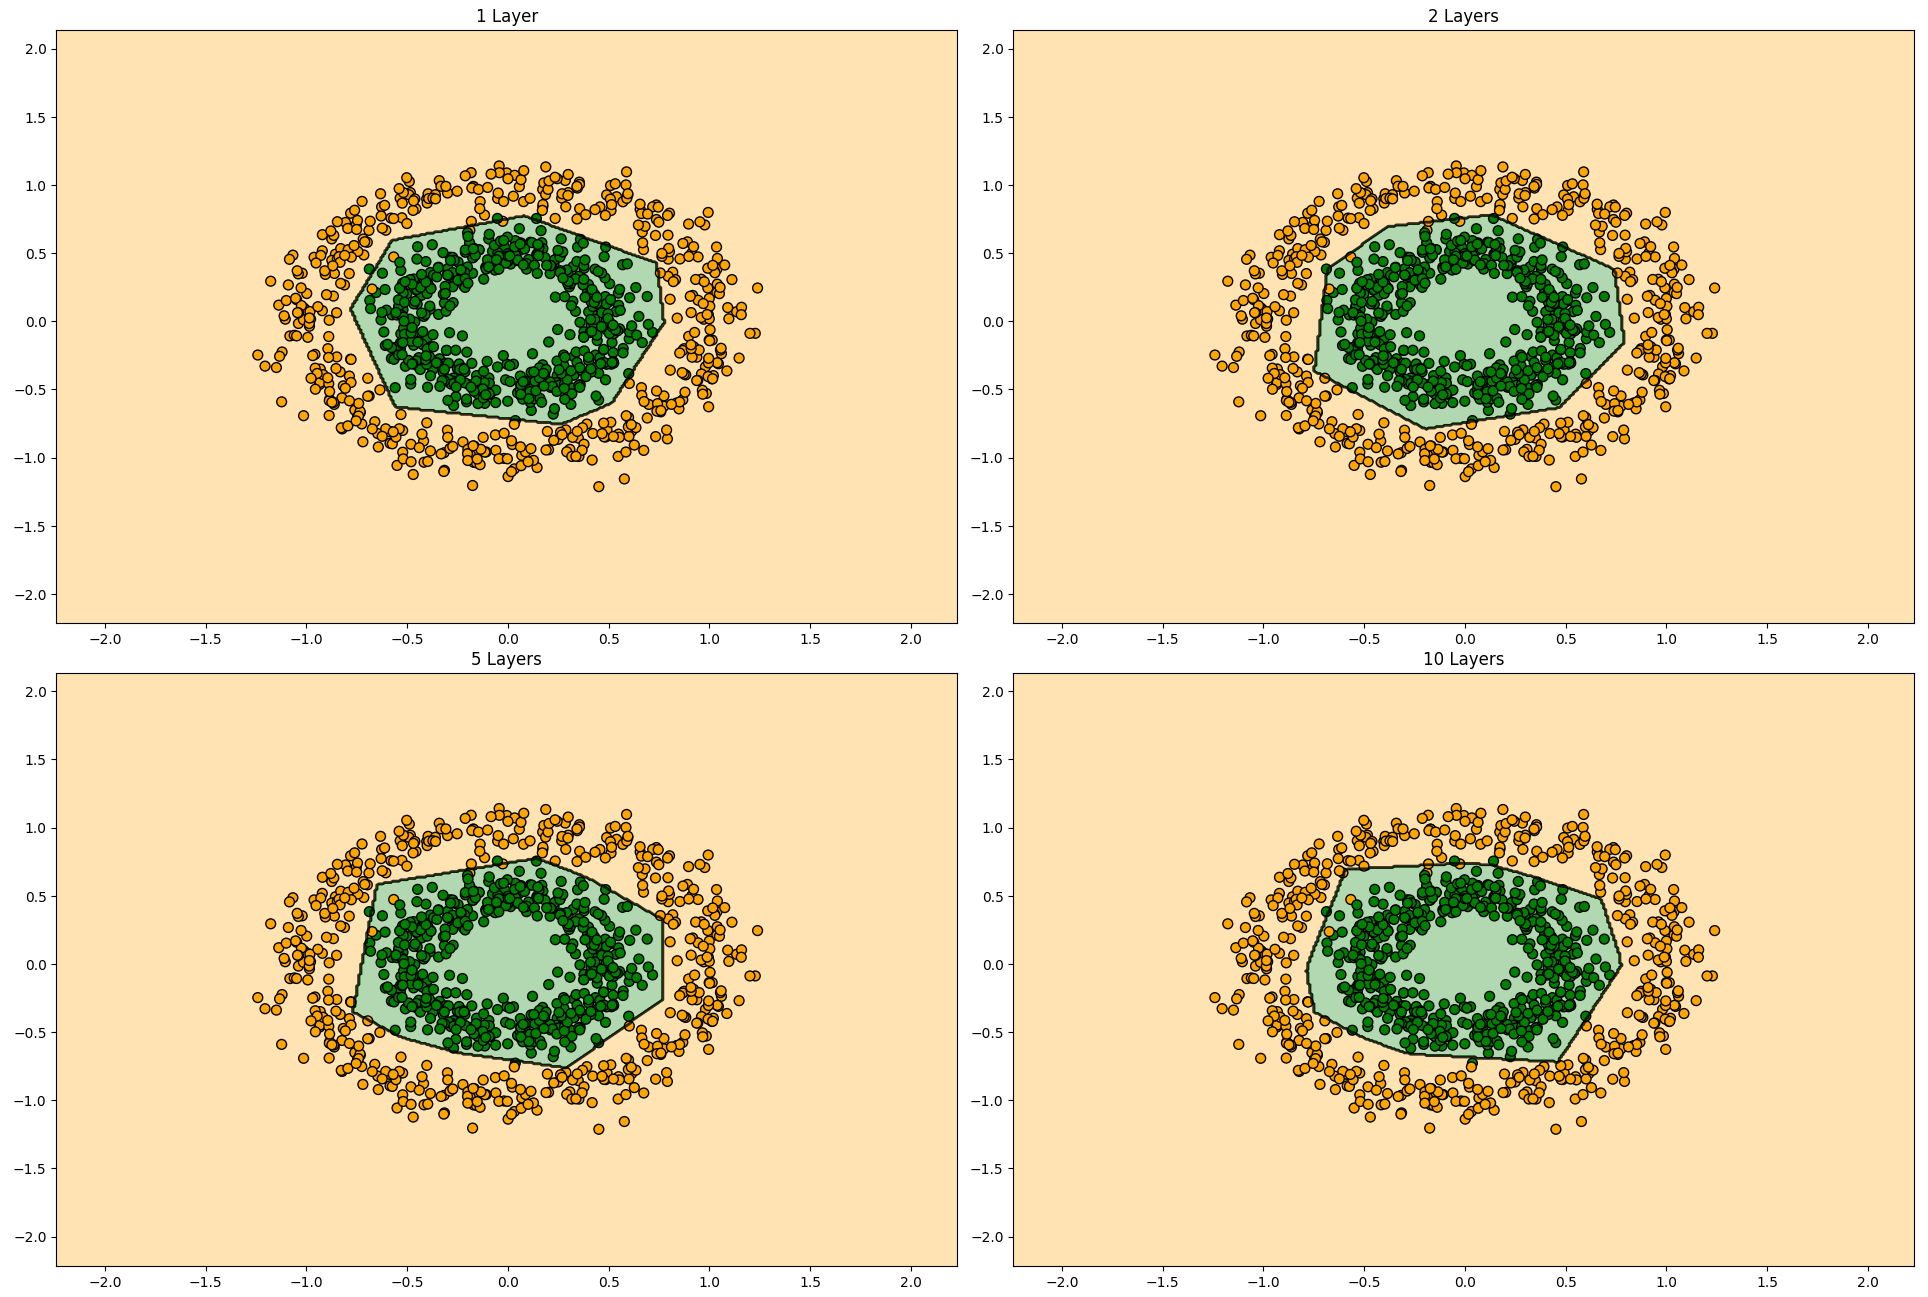
最後に層を増やして学習させてみたいと思います。
import numpy as np
import matplotlib.pyplot as plt
from sklearn.datasets import make_circles
from sklearn.model_selection import train_test_split
from sklearn.neural_network import MLPClassifier

X, y = make_circles(n_samples=1000, noise=0.1, factor=0.5, random_state=8)

X_train, X_test, y_train, y_test = train_test_split(X, y, test_size=0.3, random_state=8)

layers = [(5,), (5, 5), (5, 5, 5, 5, 5), (5, 5, 5, 5, 5, 5, 5, 5, 5, 5)]
layer_names = ['1 Layer', '2 Layers', '5 Layers', '10 Layers']

x_min, x_max = X[:, 0].min() - 1, X[:, 0].max() + 1
y_min, y_max = X[:, 1].min() - 1, X[:, 1].max() + 1
xx, yy = np.meshgrid(np.arange(x_min, x_max, 0.01), np.arange(y_min, y_max, 0.01))

plt.figure(figsize=(20, 16))

for i, layer in enumerate(layers):
    model = MLPClassifier(hidden_layer_sizes=layer, max_iter=10000, alpha=0.0001, random_state=8)
    model.fit(X_train, y_train)

    Z = model.predict(np.c_[xx.ravel(), yy.ravel()])
    Z = Z.reshape(xx.shape)

    plt.subplot(2, 2, i + 1)
    plt.contourf(xx, yy, Z, alpha=0.3, cmap=plt.cm.colors.ListedColormap(['orange', 'green']))
    plt.contour(xx, yy, Z, alpha=0.8, levels=[0], linewidths=2, colors='black')

    plt.scatter(X[:, 0], X[:, 1], c=y, cmap=plt.cm.colors.ListedColormap(['orange', 'green']), edgecolors='k', s=50)

    plt.title(f"{layer_names[i]}")

plt.tight_layout()
plt.show()

最大イタレーション数を増やしているのでご注意ください。
隠れ層の総数を増やしても決定境界にはそれほど影響を与えてなさそうです。これは隠れ層を増やすことで高次元で複雑なデータに対してその複雑な構造を捉えられるようになるパラメータだからです。1層の時点で構造自体は概ね捉えられていることからこのデータセットに関しては層数は性能向上に寄与度の高いパラメータではなさそうなことが分かりました。
■おわりに
今日は初めてディープラーニングに触れてみました。さすがはscikit-learnライブラリ、neural_networkと書くだけで簡単にディープラーニングを使うことができます。しかし実際には今回触れていないパラメータやチューニングすべき項目が多く残っています。また多層パーセプトロン以外にもアプリケーションごとに最適化されたモデルも複数存在します。
ディープラーニングの入り口として多層パーセプトロンをライブラリありきで使ってみましたが、その適応力の凄さに驚きました。ほとんどパラメータを弄ることなく、線形モデルベースとは思えないほど綺麗にクラス分類問題に対処していました。
その名前の通りこの領域には深い深い世界が広がっていると思うので、またの機会により深く浸っていきたいと思います。
■参考文献
- Andreas C. Muller, Sarah Guido. Pythonではじめる機械学習. 中田 秀基 訳. オライリー・ジャパン. 2017. 392p.
- ChatGPT. 4o mini. OpenAI. 2024. https://chatgpt.com/
- API Reference. scikit-learn.org. https://scikit-learn.org/stable/api/index.html
- ニューラル・ネットワーク. ibm.com. https://www.ibm.com/docs/ja/spss-statistics/saas?topic=trees-neural-networks